Python Code for deploying CRF
Following steps will help in installing pycrf package in Python.
1. First download the pycrf module. For PIP installation, the command is pip install python-crfsuite and for conda installation, the command is conda install -c conda-forge python-crfsuite
2. If the above installation doesn’t work, download the relevant pycrf module from https://anaconda.org/conda-forge/python-crfsuite/files. For example, if it is a windows OS, 64bit machine with python 2.7 version, then one can download win-64/python-crfsuite-0.9.2-py27_vc9_0.tar.bz2
3. Extract the pycrfsuite and python_crfsuite-0.9.2-py2.7.egg-info files and place them in the folder where the rest of the packages are present. For example, if Anaconda is used, then these files can be placed in anaconda>lib>site-packages folder.
#invoke libraries
from bs4 import BeautifulSoup as bs
from bs4.element import Tag
import codecs
import nltk
from nltk import word_tokenize, pos_tag
from sklearn.model_selection import train_test_split
import pycrfsuite
import os, os.path, sys
import glob
from xml.etree import ElementTree
import numpy as np
from sklearn.metrics import classification_report
#-------------------------------------------
# Build Functions
#-------------------------------------------
#this function appends all annotated files
def append_annotations(files):
xml_files = glob.glob(files +"/*.xml")
xml_element_tree = None
new_data = ""
for xml_file in xml_files:
data = ElementTree.parse(xml_file).getroot()
#print ElementTree.tostring(data)
temp = ElementTree.tostring(data)
new_data += (temp)
return(new_data)
#this function removes special characters and punctuations
def remov_punct(withpunct):
punctuations = '''!()-[]{};:'"\,<>./?@#$%^&*_~'''
without_punct = ""
char = 'nan'
for char in withpunct:
if char not in punctuations:
without_punct = without_punct + char
return(without_punct)
#-------------------------------------------
# Functions end
#-------------------------------------------
#import annotated data
files_path = "D:/Annotated/"
allxmlfiles = append_annotations(files_path)
soup = bs(allxmlfiles, "html5lib")
#identify the tagged element
docs = []
sents = []
for d in soup.find_all("document"):
for wrd in d.contents:
tags = []
NoneType = type(None)
if isinstance(wrd.name, NoneType) == True:
withoutpunct = remov_punct(wrd)
temp = word_tokenize(withoutpunct)
for token in temp:
tags.append((token,'NA'))
else:
withoutpunct = remov_punct(wrd)
temp = word_tokenize(withoutpunct)
for token in temp:
tags.append((token,wrd.name))
sents = sents + tags
docs.append(sents) #appends all the individual documents into one list
#Generate features. These are the default features that NER algorithm uses in nltk. One can modify it for customization
data = []
for i, doc in enumerate(docs):
tokens = [t for t, label in doc]
tagged = nltk.pos_tag(tokens)
data.append([(w, pos, label) for (w, label), (word, pos) in zip(doc, tagged)])
def word2features(doc, i):
word = doc[i][0]
postag = doc[i][1]
# Common features for all words
features = [
'bias',
'word.lower=' + word.lower(),
'word[-3:]=' + word[-3:],
'word[-2:]=' + word[-2:],
'word.isupper=%s' % word.isupper(),
'word.istitle=%s' % word.istitle(),
'word.isdigit=%s' % word.isdigit(),
'postag=' + postag
]
# Features for words that are not
# at the beginning of a document
if i > 0:
word1 = doc[i-1][0]
postag1 = doc[i-1][1]
features.extend([
'-1:word.lower=' + word1.lower(),
'-1:word.istitle=%s' % word1.istitle(),
'-1:word.isupper=%s' % word1.isupper(),
'-1:word.isdigit=%s' % word1.isdigit(),
'-1:postag=' + postag1
])
else:
# Indicate that it is the 'beginning of a document'
features.append('BOS')
# Features for words that are not
# at the end of a document
if i < len(doc)-1:
word1 = doc[i+1][0]
postag1 = doc[i+1][1]
features.extend([
'+1:word.lower=' + word1.lower(),
'+1:word.istitle=%s' % word1.istitle(),
'+1:word.isupper=%s' % word1.isupper(),
'+1:word.isdigit=%s' % word1.isdigit(),
'+1:postag=' + postag1
])
else:
# Indicate that it is the 'end of a document'
features.append('EOS')
return features
# A function for extracting features in documents
def extract_features(doc):
return [word2features(doc, i) for i in range(len(doc))]
def get_labels(doc):
return [label for (token, postag, label) in doc]
X = [extract_features(doc) for doc in data]
y = [get_labels(doc) for doc in data]
X_train, X_test, y_train, y_test = train_test_split(X, y, test_size=0.2)
#train the CRF model
trainer = pycrfsuite.Trainer(verbose=True)
for xseq, yseq in zip(X_train, y_train):
trainer.append(xseq, yseq)
# Set parameters of model
trainer.set_params({
'c1': 0.1,
'c2': 0.01,
'max_iterations': 200,
'feature.possible_transitions': True
})
# Provide a file name as a parameter to the train function, such that
# the model will be saved to the file when training is finished
trainer.train('crf.model')
#Test the model
tagger = pycrfsuite.Tagger()
tagger.open('crf.model')
y_pred = [tagger.tag(xseq) for xseq in X_test]
# Let's take a look at a random sample in the testing set
i = 0
for x, y in zip(y_pred[i], [x[1].split("=")[1] for x in X_test[i]]):
print("%s (%s)" % (y, x))
#Check model performance
# Create a mapping of labels to indices
labels = {"claim_number": 1, "claimant": 1,"NA": 0}
# Convert the sequences of tags into a 1-dimensional array
predictions = np.array([labels[tag] for row in y_pred for tag in row])
truths = np.array([labels[tag] for row in y_test for tag in row])
# Print out the classification report
print(classification_report(
truths, predictions,
target_names=["claim_number", "claimant","NA"]))
#-------------------------------------------------
#predict new data
#-------------------------------------------------
# Read new data
with codecs.open("D:/SampleEmail6.xml", "r", "utf-8") as infile:
soup_test = bs(infile, "html5lib")
docs = []
sents = []
for d in soup_test.find_all("document"):
for wrd in d.contents:
tags = []
NoneType = type(None)
if isinstance(wrd.name, NoneType) == True:
withoutpunct = remov_punct(wrd)
temp = word_tokenize(withoutpunct)
for token in temp:
tags.append((token,'NA'))
else:
withoutpunct = remov_punct(wrd)
temp = word_tokenize(withoutpunct)
for token in temp:
tags.append((token,wrd.name))
#docs.append(tags)
sents = sents + tags # puts all the sentences of a document in one element of the list
docs.append(sents) #appends all the individual documents into one list
data_test = []
for i, doc in enumerate(docs):
tokens = [t for t, label in doc]
tagged = nltk.pos_tag(tokens)
data_test.append([(w, pos, label) for (w, label), (word, pos) in zip(doc, tagged)])
data_test_feats = [extract_features(doc) for doc in data_test]
tagger.open('crf.model')
newdata_pred = [tagger.tag(xseq) for xseq in data_test_feats]
# Let's take a look at a random sample in the testing set
i = 0
for x, y in zip(newdata_pred[i], [x[1].split("=")[1] for x in data_test_feats[i]]):
print("%s (%s)" % (y, x))
By now, you would have understood how to annotate training data, how to use Python to train CRF model and finally how to identify entities from a new text. Although this algorithm provides some basic set of features that are helpful, you may come up with your own set of features to improve the accuracy of the model.
To summarize, here are the key points that we have covered in the article.
1. Entities are parts of text that are of interest for the business problem at hand.
2. Sequence of words or tokens matter in identifying entities.
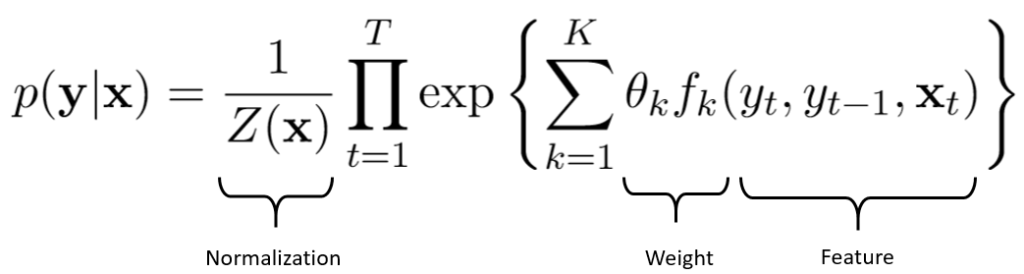
3. Pattern recognition approaches such as Regular Expressions or graph-based models such as Hidden Markov Model and Maximum Entropy Markov Model can help in identifying entities. However, Conditional Random Fields(CRF) is a popular and arguably a better candidate for entity recognition problems.
4. CRF is an undirected graph-based model that considered words that not only occur before the entity but also after it.
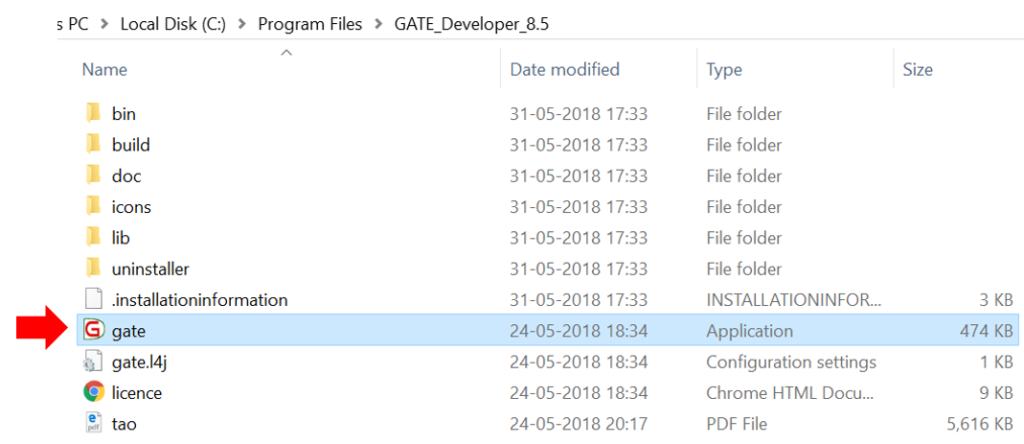
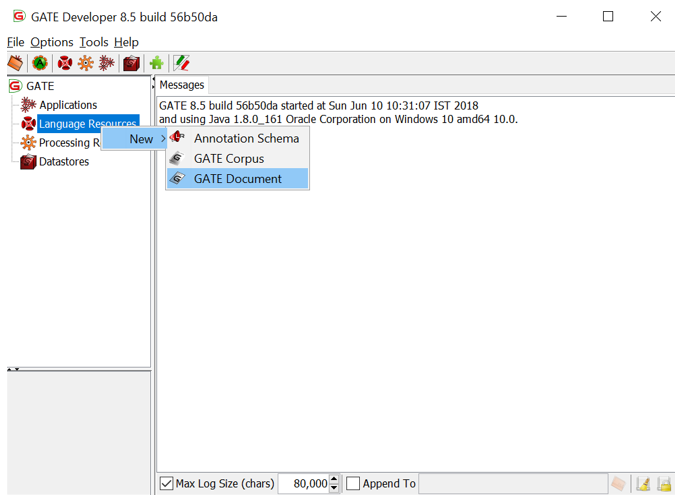
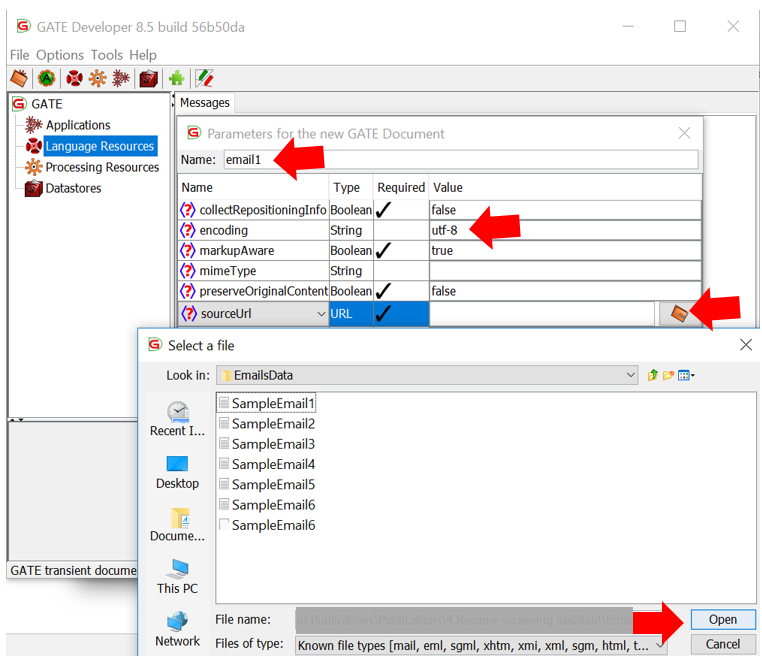
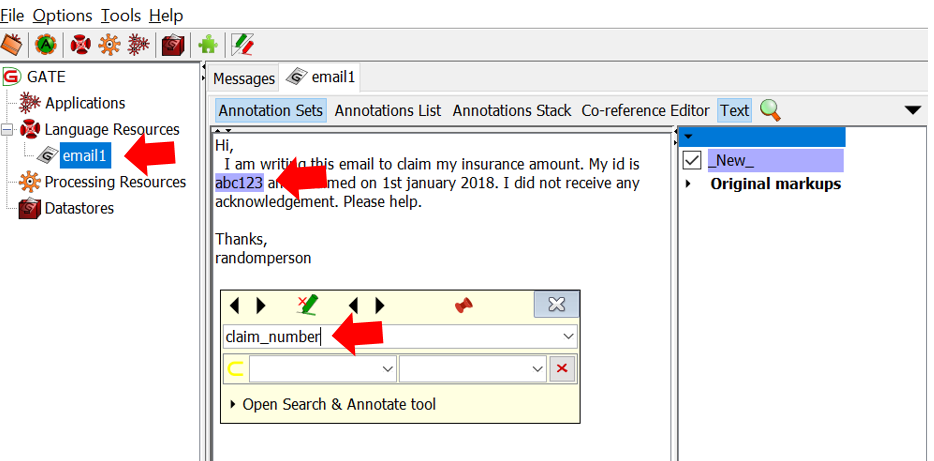
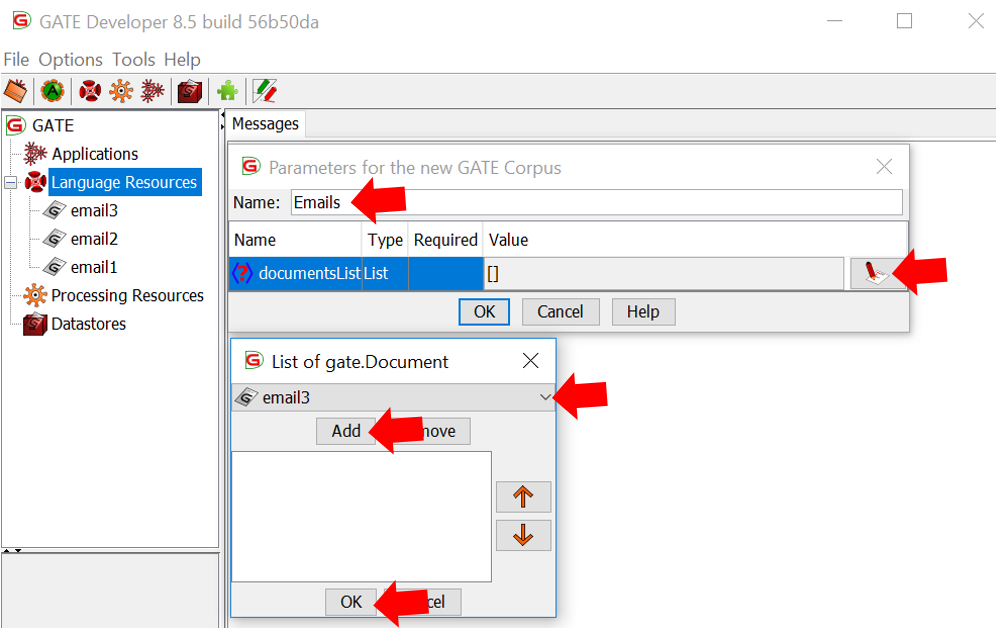
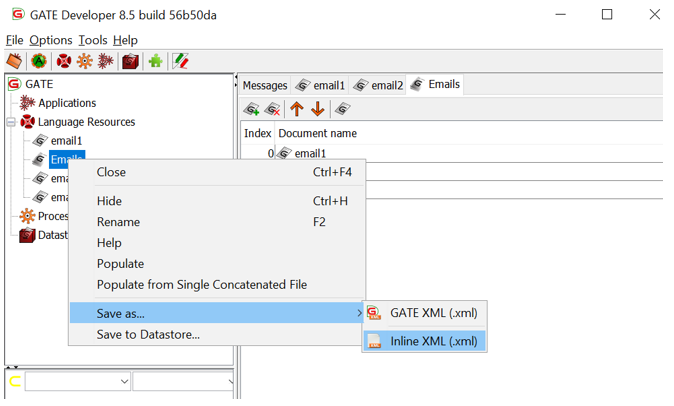
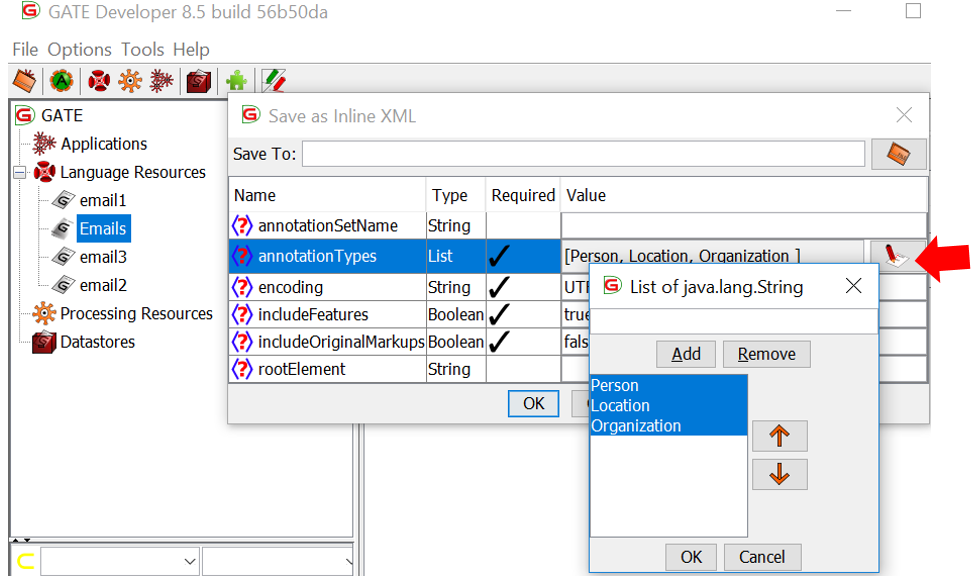
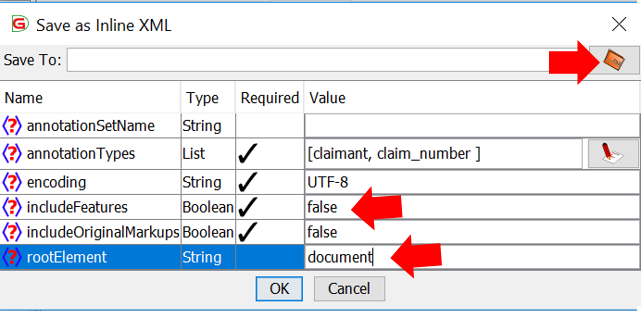
5. The training data can be annotated by using GATE architecture.
6. The Python code provided helps in training a CRF model and extracting entities from text.
7. In conclusion, this article should give you a good starting point for your business problem.